Showing posts with label Gifts. Show all posts
homemade christmas - aunt bonnie's photo display.
This is the last of the homemade Christmas gifts I'll be posting.
I bought a wooden home display thing (for lack of a better description) at a thrift store for $1, knowing that I could find something creative to do with it. I don't have a before picture, but it looked something like this, only smaller:
I had seen a few scrapbooked printer tray projects, so those were my inspiration.
My aunt's favorite color is blue, and I knew I already had a lot of cute Christmas scrapbook papers in that color, so I just went through my craft stash, grabbed anything and everything that I thought might work, and laid it all out. Then I just started playing around with different layouts.
I copied the photos of my cousins and their families from Facebook, and everything else was put together with bits of pieces of things I already had. It wasn't difficult, but I think my favorite part was forcing myself to be creative with what I had on hand.
I bought a wooden home display thing (for lack of a better description) at a thrift store for $1, knowing that I could find something creative to do with it. I don't have a before picture, but it looked something like this, only smaller:
I had seen a few scrapbooked printer tray projects, so those were my inspiration.
My aunt's favorite color is blue, and I knew I already had a lot of cute Christmas scrapbook papers in that color, so I just went through my craft stash, grabbed anything and everything that I thought might work, and laid it all out. Then I just started playing around with different layouts.
I copied the photos of my cousins and their families from Facebook, and everything else was put together with bits of pieces of things I already had. It wasn't difficult, but I think my favorite part was forcing myself to be creative with what I had on hand.
homemade christmas - kelli's picture window.
Kelli's Christmas gift was inspired by this picture window project from House of Smiths:
I LOVE this, and I knew that I could use one of the old windows stored in my attic to create a similar look. I decided to make one for Kelli, because I thought it would be a great way to include photos from our trip to Africa.
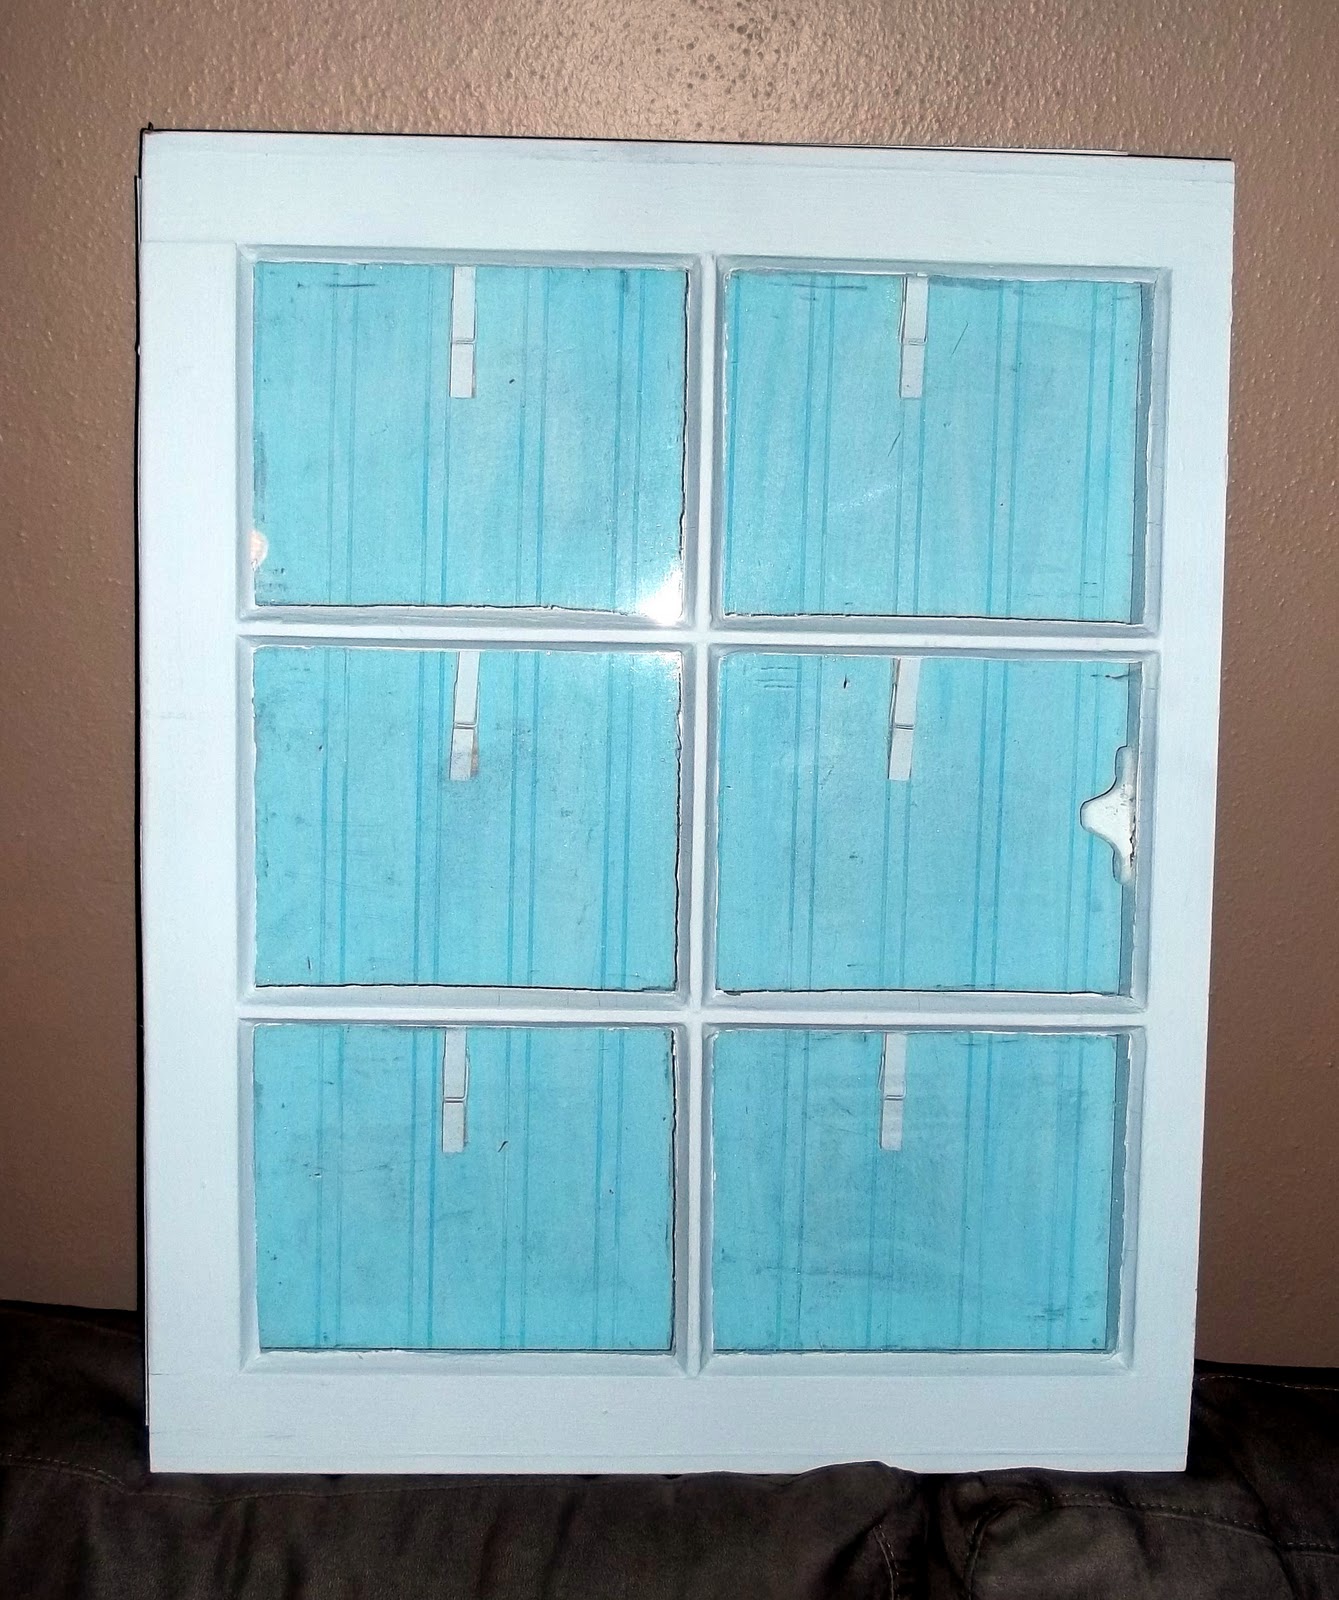
I started by painting both sides of the window white. I had a piece of thin plywood from Home Depot cut to the same dimensions as the window (using the same piece as I originally used for Jacob's chalkboard to save some money), and covered it with paintable beadboard wallpaper (like this). I painted the wallpaper with a coat of light blue (it looks darker in the photos than in person), and kept the paint pretty light, so the grooves of the wallpaper would be more pronounced.
Because one side of the window was thicker than the other three sides, I needed to beef up the beadboard/plywood a bit on those sides so everything would lay flat. Luckily, I found a piece of trim that was the perfect dimension. I cut it down, painted it white, and attached it to three sides using my nail gun.
Finally I attached hinges to one side, then glued clothespins (painted white) to the beadboard/plywood in just the right places so the photos would be centered in the window panes.
When the window is open, it looks a little rough, but you can't tell when everything is closed.
Once I put the photos in, I found that some of them tended to fall out of the clothespins, so I added some pieces of foam to the backs of the photos to beef them up a bit.
I LOVE this, and I knew that I could use one of the old windows stored in my attic to create a similar look. I decided to make one for Kelli, because I thought it would be a great way to include photos from our trip to Africa.
I started by painting both sides of the window white. I had a piece of thin plywood from Home Depot cut to the same dimensions as the window (using the same piece as I originally used for Jacob's chalkboard to save some money), and covered it with paintable beadboard wallpaper (like this). I painted the wallpaper with a coat of light blue (it looks darker in the photos than in person), and kept the paint pretty light, so the grooves of the wallpaper would be more pronounced.
Because one side of the window was thicker than the other three sides, I needed to beef up the beadboard/plywood a bit on those sides so everything would lay flat. Luckily, I found a piece of trim that was the perfect dimension. I cut it down, painted it white, and attached it to three sides using my nail gun.
Finally I attached hinges to one side, then glued clothespins (painted white) to the beadboard/plywood in just the right places so the photos would be centered in the window panes.
When the window is open, it looks a little rough, but you can't tell when everything is closed.
Once I put the photos in, I found that some of them tended to fall out of the clothespins, so I added some pieces of foam to the backs of the photos to beef them up a bit.
homemade christmas - mom's photo holder.
This is one project that went through a very different iterations, and several coats of paint, before I finally decided what I wanted to do with it
The cabinet is a thrift store find from a few months ago - you can't quite tell in the photo, but it was pretty beat up. I just took everything apart, spray-painted the entire thing (first green, then white, then finally black), and put it back together.
I was going to use small frames from the dollar store on the shelves, but after seeing this photo block idea from Shanty to Chic, I changed my plan.
I cut the blocks out of scrap pieces of 1x12s from the closet shelves project. I spray-painted each a creamy white, sanded down the edges, and added stain. I added the photos using spray adhesive, and added the words to the Family sign using this method.
All the photos are old pictures of me and my siblings. I scanned them and tried to clean them up, but they're still pretty worn - but I think that adds to the charm.
The cabinet is a thrift store find from a few months ago - you can't quite tell in the photo, but it was pretty beat up. I just took everything apart, spray-painted the entire thing (first green, then white, then finally black), and put it back together.
I was going to use small frames from the dollar store on the shelves, but after seeing this photo block idea from Shanty to Chic, I changed my plan.
I cut the blocks out of scrap pieces of 1x12s from the closet shelves project. I spray-painted each a creamy white, sanded down the edges, and added stain. I added the photos using spray adhesive, and added the words to the Family sign using this method.
All the photos are old pictures of me and my siblings. I scanned them and tried to clean them up, but they're still pretty worn - but I think that adds to the charm.
homemade christmas - katie's candle holder.
This was somewhat of a last-minute idea, but I love the way it turned out. Like a lot of my other Christmas gifts, I was in the middle of a lot of them at the same time, so I really didn't take time to take before or in-process photos.
Inspiration for this project came from these Harvest Blocks from Just Between Friends.
I used a leftover 4x4 from Victor's workshop (its wonderful having a friend who gives you his scrap pieces of wood). Most 4x4s are for outside use and salt-treated, but once they're stained, you really can't tell. All but one of the sides had some leftover glue, so I (mostly) sanded that down (I got a little lazy on the back side and bottom that I knew wouldn't be displayed).
I marked evenly spaced holes in the top and drilled them using a spade bit. I just eyeballed the correct depth for each one, stopping to measure as I went. Some went more easily than others.
Then, I stained the entire thing (except the bottom, again, getting a little lazy). Once the stain was dry, I added the quote I wanted (using the method described here). I absolutely love this - and I'm definitely thinking I'm going to make another for me!
I added a coat of spray polyurethane once the entire thing was dry.
Linking to:
Inspiration for this project came from these Harvest Blocks from Just Between Friends.
I used a leftover 4x4 from Victor's workshop (its wonderful having a friend who gives you his scrap pieces of wood). Most 4x4s are for outside use and salt-treated, but once they're stained, you really can't tell. All but one of the sides had some leftover glue, so I (mostly) sanded that down (I got a little lazy on the back side and bottom that I knew wouldn't be displayed).
I marked evenly spaced holes in the top and drilled them using a spade bit. I just eyeballed the correct depth for each one, stopping to measure as I went. Some went more easily than others.
Then, I stained the entire thing (except the bottom, again, getting a little lazy). Once the stain was dry, I added the quote I wanted (using the method described here). I absolutely love this - and I'm definitely thinking I'm going to make another for me!
I added a coat of spray polyurethane once the entire thing was dry.
Here's the final product on Katie's table:
Linking to:
homemade christmas - katie's photo holder.
This project is really, really simple and very easy to put together. It was inspired by this photo display from Shanty to Chic (they have so many wonderful ideas!) and made up of random pieces of wood I found at Michaels.
I didn't find a lot of options for pieces at Michaels (I'm sure I could have found more at a hardware store). I cut the candle holder down my miter saw - and got really lucky, because there was a screw in the bottom piece that ended just before the place where I cut it).
I glued everything together using liquid nails, the spray-painted the entire thing. It took me a few days to complete, because I waited for plenty of time for the glue to set or the paint to dry and cure before completing the next step. But since each step only took a few minutes, this might just have been the easiest project I made this Christmas.
homemade christmas - vince's flag.
Have you ever had a project in your head turn out exactly the way you wanted it to in real life? That's what this project was for me.
Its not always easy to find gifts idea for my brother-in-law Vince, but when I saw these two projects, I thought I might have found the perfect idea.
I decided to make a large flag, designed to be displayed outside, but instead of using one solid piece of wood, I wanted to use separate pieces for the Union (the "correct" name for the blue area) and each stripe. I considered a lot of different options for paint and distressing, but when I found out that I could buy sample pots of colored deck stain, I decided that would be the easiest way to get the look that I wanted.
It took a while to figure out all the right dimensions. Everything except the stars are to scale (there's my perfectionist streak), and truthfully, the stars would have been if I could have figured out a way to do it that wouldn't have taken forever to finish.
I planned to use 1x2s for each stripe, but since 1x2s are usually really rough and tough to find straight, my friend Victor suggested using 1x4s and ripping them down to size (and offered to rip them for me, which was a huge help!). He also cut scraps of wood from his own shop to the right size for the Union, and cut down the plywood I bought for the back to the right size.
I assembled the pieces to make the Union, stained everything the right color (the white stripes needed two coats), then added the stars. I raided a small star cookie cutter from my Christmas stash to use as a stencil (I got the idea from Stephanie Lynn's project), then ended up using it as a kind of stamp - I dipped it in the white stain, marked the Union, then painted the inside with a small brush. Its rough and not at all perfect, but that's kind of the idea. :-)
Everything is glued together using power adhesive. I bought some small nails thinking I might want to add them just for looks at the end, but I decided I like it just the way it is. I didn't add any hardware to the back for hanging, because I wasn't sure how Vince would want to use it.
Its not always easy to find gifts idea for my brother-in-law Vince, but when I saw these two projects, I thought I might have found the perfect idea.
I decided to make a large flag, designed to be displayed outside, but instead of using one solid piece of wood, I wanted to use separate pieces for the Union (the "correct" name for the blue area) and each stripe. I considered a lot of different options for paint and distressing, but when I found out that I could buy sample pots of colored deck stain, I decided that would be the easiest way to get the look that I wanted.
It took a while to figure out all the right dimensions. Everything except the stars are to scale (there's my perfectionist streak), and truthfully, the stars would have been if I could have figured out a way to do it that wouldn't have taken forever to finish.
I planned to use 1x2s for each stripe, but since 1x2s are usually really rough and tough to find straight, my friend Victor suggested using 1x4s and ripping them down to size (and offered to rip them for me, which was a huge help!). He also cut scraps of wood from his own shop to the right size for the Union, and cut down the plywood I bought for the back to the right size.
(Excuse the mess - as usual, I had several different projects going at one time.)
I assembled the pieces to make the Union, stained everything the right color (the white stripes needed two coats), then added the stars. I raided a small star cookie cutter from my Christmas stash to use as a stencil (I got the idea from Stephanie Lynn's project), then ended up using it as a kind of stamp - I dipped it in the white stain, marked the Union, then painted the inside with a small brush. Its rough and not at all perfect, but that's kind of the idea. :-)
Everything is glued together using power adhesive. I bought some small nails thinking I might want to add them just for looks at the end, but I decided I like it just the way it is. I didn't add any hardware to the back for hanging, because I wasn't sure how Vince would want to use it.
ethan's wall art.
My friends Bethany and James adopted their little boy, Ethan, last spring. I knew I wanted to make them something as a gift, but sometimes it takes me a while to come up with an idea I really like.
Then I saw this saying on an art print (I can't remember where), and I knew it was perfect. Bethany used to teach science to middle schoolers (and is the most naturally curious person I know), and James is a math nerd (he actually has a graduate degree in statistics).
This was a pretty easy project - I just used a couple of coats of craft paint for background color, printed the words from my computer, and transferred them to the canvas using black transfer paper and a black sharpie.
Then I saw this saying on an art print (I can't remember where), and I knew it was perfect. Bethany used to teach science to middle schoolers (and is the most naturally curious person I know), and James is a math nerd (he actually has a graduate degree in statistics).
This was a pretty easy project - I just used a couple of coats of craft paint for background color, printed the words from my computer, and transferred them to the canvas using black transfer paper and a black sharpie.
haley's wall art.
My good friends Heather and Nick just adopted their little girl, Haley Reese. She is unbelievable tiny and so beautiful.
A long time ago, when they started moving through the long adoption process, I told Heather that when they they brought their baby home, I was going to make something for them. I didn't know quite what it would be, only that it would include the following poem:
Heather knew exactly what she wanted - she asked me to create flower collages, like this and this, but in the colors of Haley's nursery. She picked out the paper and ribbon, and I painted the background of the canvases the same color as the lower half of the nursery walls. Rather than free-handing the words, I printed them out using a handwriting font (downloaded for free to dafont.com) and transferred the words using this method.
Here's the final product:
Heather did a great job picking the colors - they look absolutely adorable in Haley's room.
A long time ago, when they started moving through the long adoption process, I told Heather that when they they brought their baby home, I was going to make something for them. I didn't know quite what it would be, only that it would include the following poem:
Not flesh of my flesh
Nor bone of my bone
But still miraculously my own.
Never forget for a single minute
You didn't grow under by heart
But in it.
~ Fleur Conkling Heyliger
Nor bone of my bone
But still miraculously my own.
Never forget for a single minute
You didn't grow under by heart
But in it.
~ Fleur Conkling Heyliger
Heather knew exactly what she wanted - she asked me to create flower collages, like this and this, but in the colors of Haley's nursery. She picked out the paper and ribbon, and I painted the background of the canvases the same color as the lower half of the nursery walls. Rather than free-handing the words, I printed them out using a handwriting font (downloaded for free to dafont.com) and transferred the words using this method.
Here's the final product:
(Source: Heather, via Facebook)
Heather did a great job picking the colors - they look absolutely adorable in Haley's room.
sunday inspiration.
-- 1 --
A couple of weeks ago, I posted a list of ideas on how to care for orphans. This wonderful list, from Rage Against the Minivan, is far more extensive, and lists a lot of specific organizations that are doing this kind of work.
-- 2 --
Can you imagine praying for discomfort? Actually asking for anger, tears, and foolishness? Read this Franciscan benediction (found via Michael Hyatt):
May God bless you with discomfort
At easy answers, half-truths, and superficial relationships,
So that you may live deep within your heart.
May God bless you with anger
At injustice, oppression and exploitation of people,
So that you may work for justice, freedom and peace.
May God bless you with tears
To shed for those who suffer pain, rejection, hunger, and war,
So that you may reach out your hand to comfort them
And turn their pain into joy.
And may God bless you with enough foolishness
To believe that you can make a difference in the world,
So that you can do what others claim cannot be done
To bring justice and kindness to all our children and the poor.
Amen.
At easy answers, half-truths, and superficial relationships,
So that you may live deep within your heart.
May God bless you with anger
At injustice, oppression and exploitation of people,
So that you may work for justice, freedom and peace.
May God bless you with tears
To shed for those who suffer pain, rejection, hunger, and war,
So that you may reach out your hand to comfort them
And turn their pain into joy.
And may God bless you with enough foolishness
To believe that you can make a difference in the world,
So that you can do what others claim cannot be done
To bring justice and kindness to all our children and the poor.
Amen.
I honestly don't know if I have the courage to pray this. Do you?
-- 3 --
I love these creative gift packaging ideas from Scrapbooks, Etc (part of Better Homes and Gardens):
-- 4 --
I love this candle chandelier, but I'm wondering - wouldn't the candles potentially drip wax on the table? Or maybe on someone's head? Maybe if it had a glass on the bottom?
This idea is similar - I'm not sure which one I like more!
-- 5 --
These little photo keychains are adorable, and look really easy to make. I'm thinking about creating a few for kids' Christmas gifts this year.
Categories:
Faith,
Gifts,
Inspiration
homemade christmas.
Normally, by the end of October, I've finished writing my Christmas gift list and have purchased at least a third of the things on it. This year, I'm way behind - I've only finished one gift (mostly), and there are still several holes left on the list. And to make things worse - this year I've decided to make all my own Christmas gifts.
My main problem is the guys - its hard to find gifts for men and boys that they'll actually use.
In the meantime, here are a few great homemade gift ideas (that I'm not using):
Transform an inexpensive thrift store frame with spray paint and textured fabric, or make a beachy frame with scraps of wood:
Create a unique collage out of a thrift store cubby organizer or a wooden utensil divider:
Create a fabric-covered notebook or make a journal out of old board books:
Frame travel mementos or a map that has personal significance:
Fill a pop-top can or homemade gift box with small items:
My main problem is the guys - its hard to find gifts for men and boys that they'll actually use.
In the meantime, here are a few great homemade gift ideas (that I'm not using):
Transform an inexpensive thrift store frame with spray paint and textured fabric, or make a beachy frame with scraps of wood:
Create a unique collage out of a thrift store cubby organizer or a wooden utensil divider:
Create a fabric-covered notebook or make a journal out of old board books:
(Sources: mine and Red Heads Craft More Fun)
Frame travel mementos or a map that has personal significance:
Fill a pop-top can or homemade gift box with small items:
Back to my dilemma - anyone have any gift ideas for men and boys for me?
jacob's chalkboard.
My 7-year-old nephew Jacob loves to draw, especially with markers. So when I first heard about chalk markers (via this post), I knew that they would be a perfect birthday gift for him.
Katie and Vince are slowly refinishing their basement, so I knew that there would likely be lots of large wall space that I could fill up with a big chalkboard. I talked to Katie about my idea and about how big she wanted it to be. She said as long as I could fit it into my car, she didn't care.
Well, it fits in my car - but only if the backseat is folded down. I bought a piece of smooth luan plywood and had it cut down to size (3 feet by 4 1/2 feet) at Home Depot. Then I painted it with three coats of chalkboard paint using a small foam roller.
The frame is made of inexpensive pine 1x2s. I cut the boards, mitering the corners, then spray-painted each piece of the frame a bright blue (Jake's favorite color). I used wood glue to assemble the frame, nailing each piece together, then nailed the entire thing to the chalkboard from the back. Since the chalkboard itself was so thin, I needed to use pretty short nails, and I wanted to make sure the nails didn't miss the board entirely, like they might have if I had nailed from the front. Plus, this way I didn't need to fill or repaint nail holes.
He loves it! Now I just need to come with ideas for a Christmas gift...
Katie and Vince are slowly refinishing their basement, so I knew that there would likely be lots of large wall space that I could fill up with a big chalkboard. I talked to Katie about my idea and about how big she wanted it to be. She said as long as I could fit it into my car, she didn't care.
Well, it fits in my car - but only if the backseat is folded down. I bought a piece of smooth luan plywood and had it cut down to size (3 feet by 4 1/2 feet) at Home Depot. Then I painted it with three coats of chalkboard paint using a small foam roller.
The frame is made of inexpensive pine 1x2s. I cut the boards, mitering the corners, then spray-painted each piece of the frame a bright blue (Jake's favorite color). I used wood glue to assemble the frame, nailing each piece together, then nailed the entire thing to the chalkboard from the back. Since the chalkboard itself was so thin, I needed to use pretty short nails, and I wanted to make sure the nails didn't miss the board entirely, like they might have if I had nailed from the front. Plus, this way I didn't need to fill or repaint nail holes.
He loves it! Now I just need to come with ideas for a Christmas gift...
Categories:
Gifts
baby shower gift (boy).
I needed a last-minute baby shower gift (last minute only because I procrastinated on actually buying the gift), and though I considered making something, I couldn't come up with an idea that I was really sold on.
Then, I saw this adorable idea at somewhat simple, and decided to do the next best thing - buy a gift and package it creatively.
I love the way it turned out. The only bummer - I decided last-minute not to go to the shower (I'm still feeling under the weather), so I didn't get to see the new mom's reaction.
Then, I saw this adorable idea at somewhat simple, and decided to do the next best thing - buy a gift and package it creatively.
I picked up everything I needed at Target - a pack of onesies, a set of burp cloths, a baseball glove, a baseball, and a small plastic bucket. I layered everything together, wrapped it with cellophane basket wrap, and tied a ribbon on it from my stash.
(please ignore the messy house in the background)
I love the way it turned out. The only bummer - I decided last-minute not to go to the shower (I'm still feeling under the weather), so I didn't get to see the new mom's reaction.
Categories:
Gifts
russian art.
A few weeks ago, my aunt told me that she had found some things at an auction that she knew I would like. She gave them to me tonight, and she's right - I love them.
They're paintings of scenes from Moscow, and they are beautiful, though my late-night pictures don't do them justice:
The second one, at least, looks like an original watercolor. The writing at the bottom of each is in Russian, so I tried to take pictures to send to a friend for help translating. Unfortunately, it was tough at night to get a good shot of the second, but here's the first:
I'm planning to build frames for them to match the ones I already built for the dining room.
They're paintings of scenes from Moscow, and they are beautiful, though my late-night pictures don't do them justice:
The second one, at least, looks like an original watercolor. The writing at the bottom of each is in Russian, so I tried to take pictures to send to a friend for help translating. Unfortunately, it was tough at night to get a good shot of the second, but here's the first:
I'm planning to build frames for them to match the ones I already built for the dining room.
kristin's journal.
My friend Kristin is graduating from high school tomorrow, and I wanted to make her something special for a gift.
We've spent a lot of time over the past year talking about taking risks, and moving outside of your comfort zone. Kristin has followed God's leading this year to do so many things that have scared her to death, but she's followed anyway, and learned so much about faith in the process.
I spent some time looking online for a journal or notebook that would speak to all of that. When I didn't have any luck, I decided to make my own - and this is the finished result!
I love how it turned out - even better than the picture I had in my head.
In addition to the cover, there are three dividers inside as well, each covered with a different piece of patterned paper. Most of the inside pages are blank, but the first page of each section has a quote that reminded me of Kristin.
I also added a pocket inside the front and back covers - the front has a little note from me to Kristin, and back containers several scrapbooking photo corners, in case she wants to add photos to some of the pages.
The best part? I used a children's board book I bought at the thrift store for the covers and dividers, thanks to this inspiration from Nap Time Journal on cheap chipboard albums. I just covered used a box cutter to carefully separate the pages, then covered the pictures of the Little Mermaid with scrapbook paper.
I'm so happy with the end result, and can't wait to give it to Kristin tonight!
Edited to add: I'm linking this up to Feature Yourself Friday.
We've spent a lot of time over the past year talking about taking risks, and moving outside of your comfort zone. Kristin has followed God's leading this year to do so many things that have scared her to death, but she's followed anyway, and learned so much about faith in the process.
I spent some time looking online for a journal or notebook that would speak to all of that. When I didn't have any luck, I decided to make my own - and this is the finished result!
I love how it turned out - even better than the picture I had in my head.
In addition to the cover, there are three dividers inside as well, each covered with a different piece of patterned paper. Most of the inside pages are blank, but the first page of each section has a quote that reminded me of Kristin.
I also added a pocket inside the front and back covers - the front has a little note from me to Kristin, and back containers several scrapbooking photo corners, in case she wants to add photos to some of the pages.
The best part? I used a children's board book I bought at the thrift store for the covers and dividers, thanks to this inspiration from Nap Time Journal on cheap chipboard albums. I just covered used a box cutter to carefully separate the pages, then covered the pictures of the Little Mermaid with scrapbook paper.
I'm so happy with the end result, and can't wait to give it to Kristin tonight!
Edited to add: I'm linking this up to Feature Yourself Friday.
old window turned message board.
Edited to add: I'm linking this up to The CSI Project for Frames, Art, and Wall Decor week:
I'm back home after what felt like a whirlwind weekend in Maryland for my sister Katie's wedding. And now that I've delivered the project I made for her birthday, I can finally post about it.
The corner panels are corkboard, the center panel is a chalkboard, and the remaining ones are magnetic. I used one of the 259 or so old windows in my garage, and removed the glass (the same way I did for my jewelry organizer). I also bought a few supplies I didn't have on hand:
an piece of plywood flooring (the cheapest I could find), cut down to size at Home Depot
magnetic primer
green spray paint (to go on top the magnetic primer)
chalkboard paint
hooks
(I actually did have some spray chalkboard paint on hand, but the quart-size, brush-on kind of chalkboard paint is a better value, and then I didn't need to worry about overspray).
I won't rehash the exact steps I took for this project, but there are a couple things I learned along the way.
First - it is absolutely essential that you stir magnetic primer. I'm generally lazy about paint and just kind of shake up for a few minutes before I open it. Normally that works well enough, but with magnetic primer, it doesn't. In this case, I painted two coats, added the spray paint, then realized way too late that the magnets weren't working. At all. So I started over, stirring it this time. Rather than the consistency of paint, it was very thick and goopy. The resulting finish wasn't nearly as smooth as I would have liked.
It would have been much easier to use thin cork tiles, but I was trying to use what I had. The corkboard was thick, and while it wasn't hard to cut, it was hard to cut cleanly. On the other hand, if you're using cork tiles, you would need to at least double them up.
Because I was using thick pieces, I decided to attach them to the frame itself rather than the backing board. I cut each piece to fit snugly into the panel, and added some hot glue to reinforce it a bit (knowing that once the backing board was attached, everything would stay together). This made it a lot easier to line everything up - the chalkboard panel was the only tricky part.
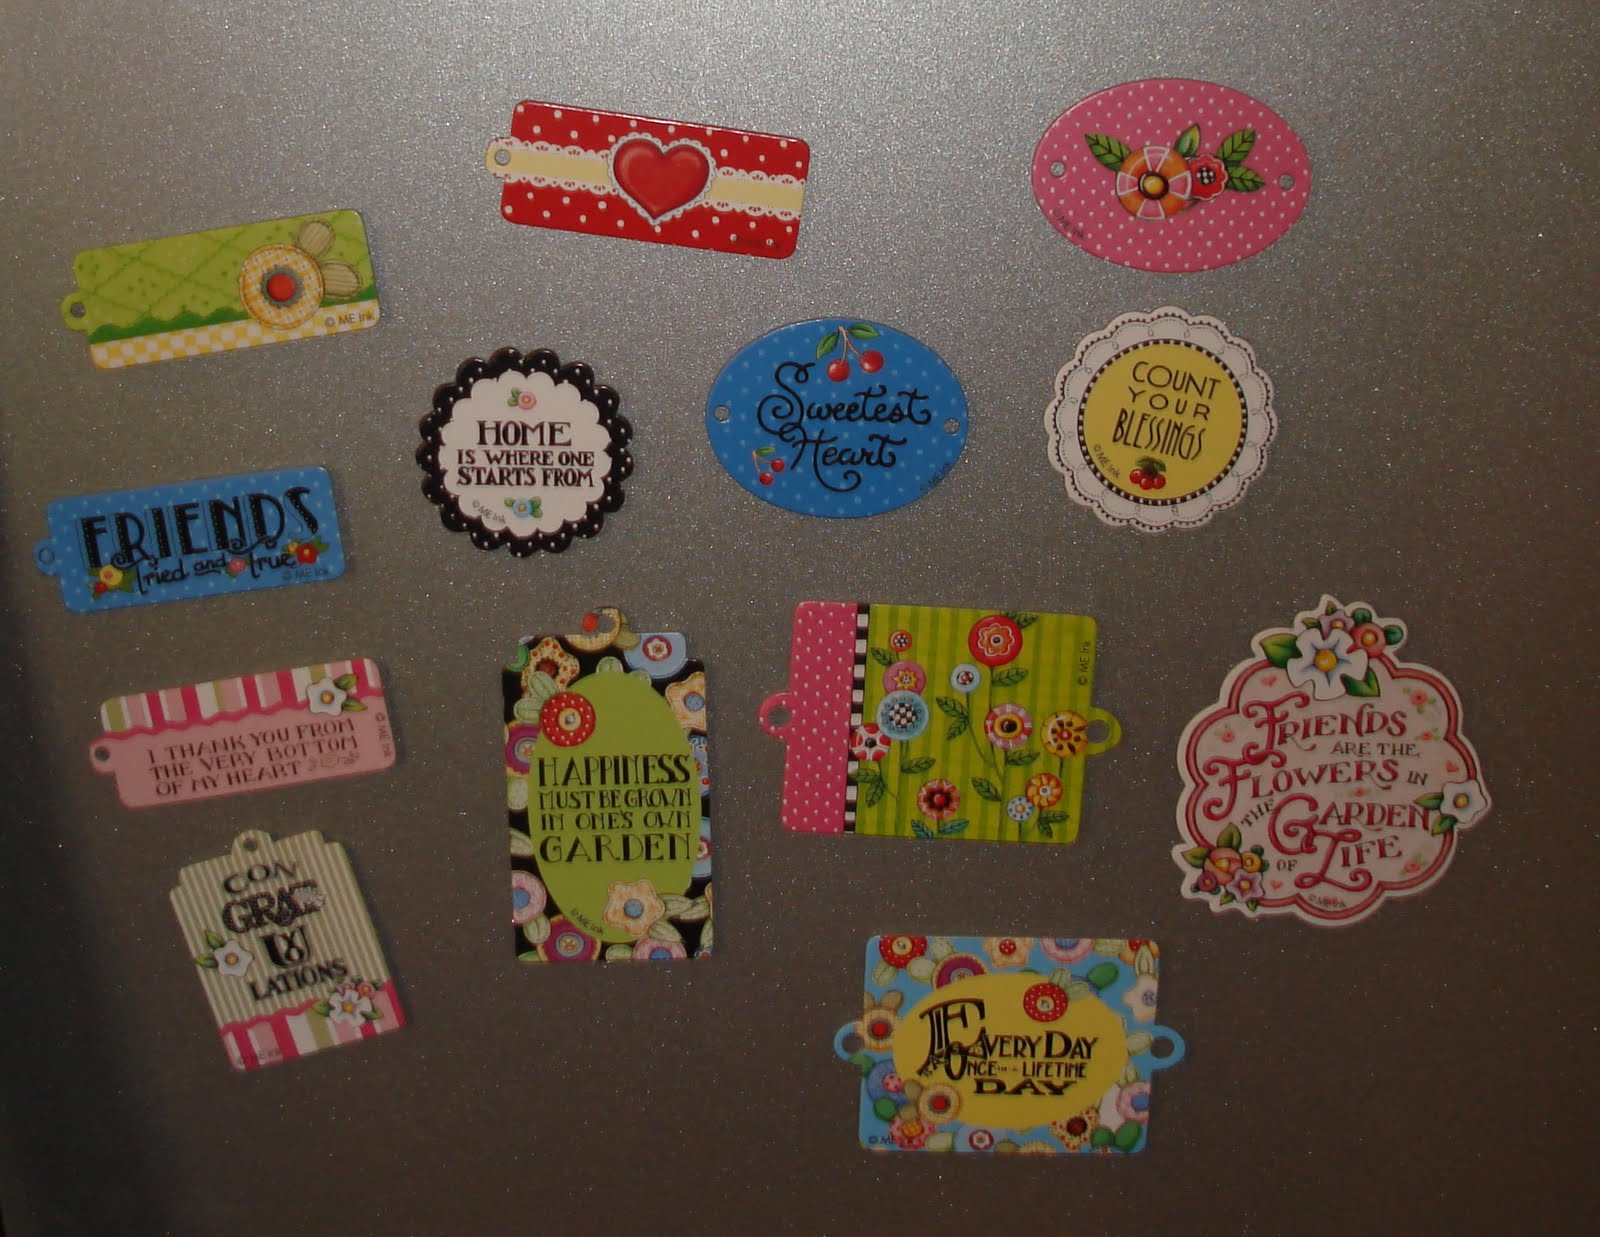
I also made up some simple and inexpensive magnets, using Mary Engelbreit scrapbooking chipboard from Michaels and magnet strips. I wrapped these up and gave them to Katie, with a note that said part two of her gift was too big to wrap.
Its hard to read them in the photo, but my favorite is the one at the bottom:
Every day is a once-in-a-lifetime day.
I'm back home after what felt like a whirlwind weekend in Maryland for my sister Katie's wedding. And now that I've delivered the project I made for her birthday, I can finally post about it.
I was thinking about making some sort of memo board out of an old window, when I saw this message board project at The Feminist Housewife, and knew it was the perfect inspiration. This is the final result:
an piece of plywood flooring (the cheapest I could find), cut down to size at Home Depot
magnetic primer
green spray paint (to go on top the magnetic primer)
chalkboard paint
hooks
(I actually did have some spray chalkboard paint on hand, but the quart-size, brush-on kind of chalkboard paint is a better value, and then I didn't need to worry about overspray).
I won't rehash the exact steps I took for this project, but there are a couple things I learned along the way.
First - it is absolutely essential that you stir magnetic primer. I'm generally lazy about paint and just kind of shake up for a few minutes before I open it. Normally that works well enough, but with magnetic primer, it doesn't. In this case, I painted two coats, added the spray paint, then realized way too late that the magnets weren't working. At all. So I started over, stirring it this time. Rather than the consistency of paint, it was very thick and goopy. The resulting finish wasn't nearly as smooth as I would have liked.
It would have been much easier to use thin cork tiles, but I was trying to use what I had. The corkboard was thick, and while it wasn't hard to cut, it was hard to cut cleanly. On the other hand, if you're using cork tiles, you would need to at least double them up.
Because I was using thick pieces, I decided to attach them to the frame itself rather than the backing board. I cut each piece to fit snugly into the panel, and added some hot glue to reinforce it a bit (knowing that once the backing board was attached, everything would stay together). This made it a lot easier to line everything up - the chalkboard panel was the only tricky part.
I also made up some simple and inexpensive magnets, using Mary Engelbreit scrapbooking chipboard from Michaels and magnet strips. I wrapped these up and gave them to Katie, with a note that said part two of her gift was too big to wrap.
Its hard to read them in the photo, but my favorite is the one at the bottom:
Every day is a once-in-a-lifetime day.
photo clip frame/plaque.
This project (I'm not really sure what to call it) is somewhat inspired by this burlap photo art at Shanty2Chic, and another project that I remember seeing but must not have saved.
I found these plaques several months ago at a thrift store and bought them because I just knew I could find something to do with them. Sometime.
So here's the first project:
At one of Katie's baby showers when she was pregnant with Jake, she got a card with this poem on it. She loved it (and probably teared up when she read it, both because its really sweet and because she teared up at anything when she was pregnant). I had forgotten about it until last year, when I was helping her clean out a closet in preparation for a move (which basically means I kept throwing things in the trash and reminding her that now was not the time to look through old photo albums).
She wanted to keep the card, but I borrowed it so I could copy the words, then slipped it back in the box. I had a few ideas for using it last year, but nothing really panned out. But I love it on this plaque!
This is what it says:
Someday
Someday, he'll be a big-time movie star
or a fifth-grade English teacher.
Someday, he'll marry, have a few kids.
Maybe not.
Maybe not.
Someday, he'll change the world as we know it,
or maybe he'll travel,
send postcards from China, phone you from Paris.
or maybe he'll travel,
send postcards from China, phone you from Paris.
Someday, he's going to be a big, strong man
able to carry you in his arms.
One day, he'll have his own hopes and dreams,
not knowing that once upon a quiet time,
you closed your eyes and made a wish
to one day have him in your life.
not knowing that once upon a quiet time,
you closed your eyes and made a wish
to one day have him in your life.
To make this, I spray painted the plaque a solid black, then decoupaged (using Modge Podge) the red scrapbook paper on to it (the paper came with the star cut-outs). I printed out the poem and decoupaged that on, then add a coat of Modge Podge on top of everything.
Katie loves stars, and I just happened to have several small metal ones laying around. I spray painted one of them black and decoupaged paper on to each section of the star.
To attach the bulldog clip, I drilled a small pilot hole, then added the screw and washer by hand (the only screw head I had was too big). I used a tip my dad taught me (that his dad taught him) - if you coat a screw with bar soap before screwing it in, it tends to grip better, and you run less chance of the wood splitting.
Then I printed out a black and white photo of Katie and Jake (one of my favorites) and added it to the clip.
(finished product at Katie's house)
She teared up when she opened the gift on Christmas morning, so I consider that a success!
Update: I'm linking this to DIY Day at A Soft Place to Land, Get Your Craft On at Today's Creative Blog, and the Power of Paint Party at Domestically Speaking.
Subscribe to:
Posts (Atom)


.jpg)