Have you heard this song (Follow You - Leeland with Brandon Heath)?
Here's the lyric that I keep getting stuck on:
I'll follow you into the homes of the broken
Follow you into the world
I'll meet the needs for the poor and the needy, God
I'll follow you into the world
This is such a beautiful picture for me as I think about starting training in a couple weeks to be a Court Appointed Special Advocate. I like the reminder that we need to go to those who need Christ, rather than waiting for them to come to us. And I really love the reminder that we're not going alone, that not only does God go with us, but that he's already there.
Another thing that I found beautiful today:
The next day He [Jesus] purposed to go into Galilee, and He found Philip. And Jesus said to him, "Follow Me."
- John 1:43
Jesus chose to go to Galilee, and he chose Philip. And he chose me.
building custom shelves, part 1.
While I am still working on painting and organizing all of the stuff in my new closet, I wanted to go ahead and write out the details of the project - what we bought, what we did, and what I would have done differently. This is partly in case anyone reading this actually wants to know the details, but mostly its just for me - so I have record of everything for next time.
We cleared everything out, including the existing shelves. The only thing that stayed was the light (just a bare bulb) and the top shelf across the top. At first I considered keeping the shelves on the left side and building the new shelves to sit flush with them, but it was easier to just lose them altogether and build exactly what I wanted (and I don't think it would have saved me much money, anyway).

In the course of pulling things out, we discovered something else - one of the previous shelves was actually blocking the access door to the bathroom plumbing (and would have needed to be ripped out to access that). Now, the new shelf sits in front of the access door, but is easily removable (its the only shelf not nailed down).
The entire width of the closet is about 4 1/2 feet, and I wanted to leave 2 feet on the right for hanging space, larger items like my vacuum, and a pegboard on the wall for a broom and ironing board. There are five shelves on the left, each 2 1/2 feet wide and 2 feet deep.
This is the complete list of everything I bought:
5 6-foot lengths of 1x12 - $51
2 8-foot lengths of 1x4 - $8
1 6-foot length of 1x4 - $3
6 8-foot length of 1x2 - $5
2x4 pegboard - $7
pegboard hooks - $3
closet rod - $7
primer - $20
screws for the light bulb fixture - $1
Total spent: $105
In addition to basic hand tools (hammer, pencil, level, tape measure), we used these tools:
circular saw (though we could have used a miter saw for all but the 1x12s and pegboard)
nail gun
electric drill/screwdriver
hand saw
The 1x12s formed the basis of each shelf. Each piece was cut into 2 30-inch sections, then laid side by side to create a shelf that is 30 inches wide and 23 inches deep (a 1x12 is actually 3/4-inch x 11 1/2-inch, so two 11 1/2-inch widths = 23 inches). The 1x4s provided the vertical supports (necessary because the shelves weren't extending the length of the closet) and the horizontal supports for the closet rod. The 1x2s were the shelf supports - they were attached directly to the wall and vertical supports on 3 sides (left, back, and right), and then the shelves were attached to them (except for the bottom shelf, as I described above).

Still to come - the details, part 2.
updated jewelry organizer.
While I'm working on painting the closet (a process that I'm convinced will be longer and a lot less fun than building the shelves), I thought I'd share another project I finished up recently.

I've been planning to redo my old jewelry organizer for a while, since I painted my bedroom (6 months ago!). Since then, my jewelry has been sitting in a big pile on my dresser, which, clearly, doesn't work too well.
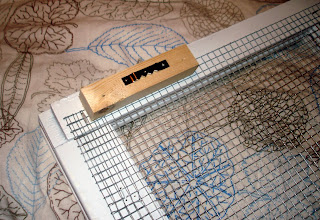
I love using fencing mesh to store my jewelry, because its completely customizable to what I have, and I like having my stuff on display. The problem is, because this stuff comes in a roll, its really difficult to get it flattened out properly, unless its stapled to something.

I've made some of these for others using an empty frame, but for this one, I wanted to use an old window - thanks to Victor, I have tons of them in my garage (and boy do I have plans for them!). I busted out all of the glass (very carefully), then cleaned up the frame and primed and painted it. Painting took quite a while - its so cold in my garage that it took a while for each coat to dry.
I had originally hoped to use the mesh from my old organizer - unfortunately, it wasn't quite large enough. I bought more, then cut it down to size using wire cutters (I used one of my jewelry-making tools, but you could also use the inside part of a pair of needle-nosed pliers).
I stapled the mesh to the back using my staple gun, then realized the mesh wasn't straight. So, I took out all of the staples, lined it up properly this time, then stapled again.
One thing that's difficult about working with this stuff is that the edges are really sharp, particularly in places where you've just cut it (and I have the scratches on my hands to prove it). This also makes laying it out just right a bit tricky, especially because it just wants to roll right back up again. Once the first two staples are in place (each on an opposite side), it goes much more quickly.
I also bought knobs to attach at the bottom (then had to buy longer screws, too), just to add some more hanging space.
After I hung up it up and added all my jewelry, I discovered a couple more problems. I used a picture hanger on the center of the back, and while that would be sufficient for most things, the varying weight of the jewelry and the fact that I was constantly touching it meant that it never quite hung straight. Also, the mesh hung right up next to the wall, meaning it was difficult to hook the jewelry into it.
To fix both of these, I added a couple of small pieces of wood (leftover from the closet project) to each side of the back, then added picture hangers to those pieces. I also added a couple of pieces at the bottom so it would hang straight.
All told, the project cost me about $20:
mesh - $8 (with plenty leftover for other projects)
knobs - $10 (5 at $2 each)
longer screws - $2
old window - free
wood pieces for the back - free
picture hangers - I already had these on hand
And now my jewelry is organized, once again!

I've been planning to redo my old jewelry organizer for a while, since I painted my bedroom (6 months ago!). Since then, my jewelry has been sitting in a big pile on my dresser, which, clearly, doesn't work too well.
I love using fencing mesh to store my jewelry, because its completely customizable to what I have, and I like having my stuff on display. The problem is, because this stuff comes in a roll, its really difficult to get it flattened out properly, unless its stapled to something.

I've made some of these for others using an empty frame, but for this one, I wanted to use an old window - thanks to Victor, I have tons of them in my garage (and boy do I have plans for them!). I busted out all of the glass (very carefully), then cleaned up the frame and primed and painted it. Painting took quite a while - its so cold in my garage that it took a while for each coat to dry.
I had originally hoped to use the mesh from my old organizer - unfortunately, it wasn't quite large enough. I bought more, then cut it down to size using wire cutters (I used one of my jewelry-making tools, but you could also use the inside part of a pair of needle-nosed pliers).
I stapled the mesh to the back using my staple gun, then realized the mesh wasn't straight. So, I took out all of the staples, lined it up properly this time, then stapled again.

One thing that's difficult about working with this stuff is that the edges are really sharp, particularly in places where you've just cut it (and I have the scratches on my hands to prove it). This also makes laying it out just right a bit tricky, especially because it just wants to roll right back up again. Once the first two staples are in place (each on an opposite side), it goes much more quickly.
I also bought knobs to attach at the bottom (then had to buy longer screws, too), just to add some more hanging space.
After I hung up it up and added all my jewelry, I discovered a couple more problems. I used a picture hanger on the center of the back, and while that would be sufficient for most things, the varying weight of the jewelry and the fact that I was constantly touching it meant that it never quite hung straight. Also, the mesh hung right up next to the wall, meaning it was difficult to hook the jewelry into it.
To fix both of these, I added a couple of small pieces of wood (leftover from the closet project) to each side of the back, then added picture hangers to those pieces. I also added a couple of pieces at the bottom so it would hang straight.

All told, the project cost me about $20:
mesh - $8 (with plenty leftover for other projects)
knobs - $10 (5 at $2 each)
longer screws - $2
old window - free
wood pieces for the back - free
picture hangers - I already had these on hand
And now my jewelry is organized, once again!
twitter and facebook.
Excuse the boring business post, but I'm trying to link my blog feed, twitter, and facebook together. This is just a test to see if everything is set up properly.
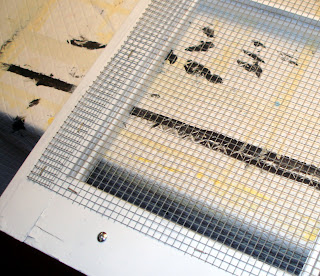
adding shelves to the closet.
Otherwise known as: My Valentine's Day rocked because I got to use power tools!

My parents came to visit for a couple of days this weekend, so I asked Dad to help me build some shelves to organize my hall closet.
First, the before, in all its disorganized glory:

This closet sits in the short hallway just before the bathroom (hence the angled pictures - there is just no way to get a full head-on shot). I use this closet for all sorts of things - bath linens and toiletries, cleaning supplies, tools, and other general storage. I realized a while ago that I needed more shelf space than hanging space, so I added wire storage cubes, similar to this:

(photo from Walmart.com)
Unfortunately, though this did add a lot more storage space, it also added some new problems. The unit blocked some of the wooden shelves that were built into the left side of the closet, so it was difficult to get to them. There also wasn't a lot of space left on the right, for the few things that I don't want on shelves, like brooms, an ironing board, and my vacuum cleaner.
Also, because the shelves aren't solid, smaller items rarely sat flat, making the whole thing look disorganized. Dust and dog hair were always getting trapped between the bottom grid piece and the floor, and there was still wasted space above the unit, space I knew I could use better.
And finally, though the sliding doors kept the contents of the closet hidden from view, they were also cumbersome. (Generally, I think that closet doors only work if they open out and don't come with a center support - otherwise, they're just in the way.)
So, with Dad's help and guidance, I set out to make the space work the way I really needed it to. I removed the doors and emptied the closet. We added five deep shelves to the left-hand side, removed the old closet rod and replaced it with a smaller version, and added a pegboard to the right-hand wall for storing brooms and such.
Here's what it looks like now, unfinished:

Stay tuned for a more detailed post on how exactly the shelves were created, and then once I have everything primed, painted, and restocked, I'll share the after photos.
In the meantime, check out more diy projects at DIY Day at A Soft Place to Land.
quick takes.
--- 1 ---
Lots of little things running around my head lately, hence the format of this post (modeled after 7 Quick Takes Friday at Conversion Diary, though I'm not making this a regular thing, not linking up, and not even listing 7 things. Maybe. We'll see.
-- 2 --
Speaking of Conversion Diary, its the blog of a woman who converted to Catholicism from atheism, and it makes for a pretty interesting read. Even if you're not Catholic. This post is my favorite.
-- 3 --
It occurred to me this week that whenever I do blog every day for a month (goal #13 for 2010), the two people who actually read this blog are going to be bored out of their minds. Because I'm just not sure I can come up with something interesting to say every day for a month.
-- 4 --
Speaking of goals (is it weird how my brain is so linear?), my tv fast has been an epic failure. Witness the fact that I'm actually typing this in front of the TV.
-- 5 --
I'm so glad I don't live in Frederick this winter! Though I do love how blue the sky is after a snowfall. My sisters have posted videos and photos to Facebook - my favorites:
My brother climbing the snow mountain with trash bags on his feet
(aka "Bailey is the smartest one of the bunch")
Lexie chasing her ball
(aka "I could be a sled dog!")
(aka "Bailey is the smartest one of the bunch")
Lexie chasing her ball
(aka "I could be a sled dog!")

Appropriately named Snowmaggedon 2 (Kelli's photo)

Baltimore's Inner Harbor, partly frozen (Kelli's photo)
-- 6 --
My parents are coming to visit this weekend (they made it out of Frederick before Tuesday's blizzard), and I'm excited to hang out with them, but I'm also excited because my dad and I are going to build custom shelves in my hall closet (part of goal #8), and because he's bringing some of his power tools!
-- 7 --
Oh, look, I did do 7!
safe.
These are the hands that built the mountains
The hands that calmed the sea
These are the arms that hold the heavens
They are holding you and me
These are the hands that healed the leper
Pulled the lame up to their feet
These are the arms that were nailed to a cross
To break our chains and set us free
The hands that calmed the sea
These are the arms that hold the heavens
They are holding you and me
These are the hands that healed the leper
Pulled the lame up to their feet
These are the arms that were nailed to a cross
To break our chains and set us free
my tv fast.
Starting Friday, February 5, I'm fasting from TV for a week.
I imagine that for many people, that wouldn't be that difficult, or, at the very least seem somewhat pointless. But I've been thinking about this for a while, and I know that sometimes, in order to actually achieve balance in your life, its necessary to go to the other extreme. (I learned that from a very smart friend of mine).
I'm convicted to do this for several reasons:
Who knows? This might even be a precursor to crossing goal #13 off my list. Here's to a productive week - wish me luck!
I imagine that for many people, that wouldn't be that difficult, or, at the very least seem somewhat pointless. But I've been thinking about this for a while, and I know that sometimes, in order to actually achieve balance in your life, its necessary to go to the other extreme. (I learned that from a very smart friend of mine).
I'm convicted to do this for several reasons:
- I'm fairly certain that if I sat down and added it up, I would feel pretty chastised about the number of hours I spend watching TV. I'm often doing other things at the same time, but still, you're rarely as productive when you're multitasking as when you're not.
- I'm working my way through several cleaning/organizing projects, with a goal to have all of them completed before my parents arrive for a visit in a little over a week. I set the goal partly because I just work better with an end result and timeline in mind, and partly because they need a place to sleep that isn't covered with stuff.
- I'm not a morning person - given my choice, I usually prefer to stay in bed until well after the sun has come up. But I also like the way my day progresses (and my general attitude) when I read my Bible in the morning, work out before work, and get dressed without feeling rushed. That means getting up earlier, which means going to bed earlier - all of which is easier without the distraction of the TV.
- I've become more aware recently that I often turn on the TV as background noise, which is essentially filling a void. I imagine that over the next week, I'll turn on music instead, but I see a difference between the two - listening to music can serve as a backdrop to thinking and planning and dreaming, while the story on the TV, even as background noise, usually distracts me from those things. I'm wondering how much of life I'm missing in my rush to fill the silence with something that distracts me.
- I only have 24 hours in a day, less when you discount the ones already committed to sleeping, working, and transitioning between those two. I want to make those that remain count, too, rather than just seeking to be constantly entertained.
Who knows? This might even be a precursor to crossing goal #13 off my list. Here's to a productive week - wish me luck!
Subscribe to:
Posts (Atom)